Upload Data
The Upload Data module is the starting point of every analysis session. It guides you through selecting your data directory, specifying patients and datasets, and validating that all required files have been found before the analysis begins.
If you have previously saved a session, you can skip this process entirely by loading it directly — see Session Management below.
Step 1: Directory, Patients, and Datasets
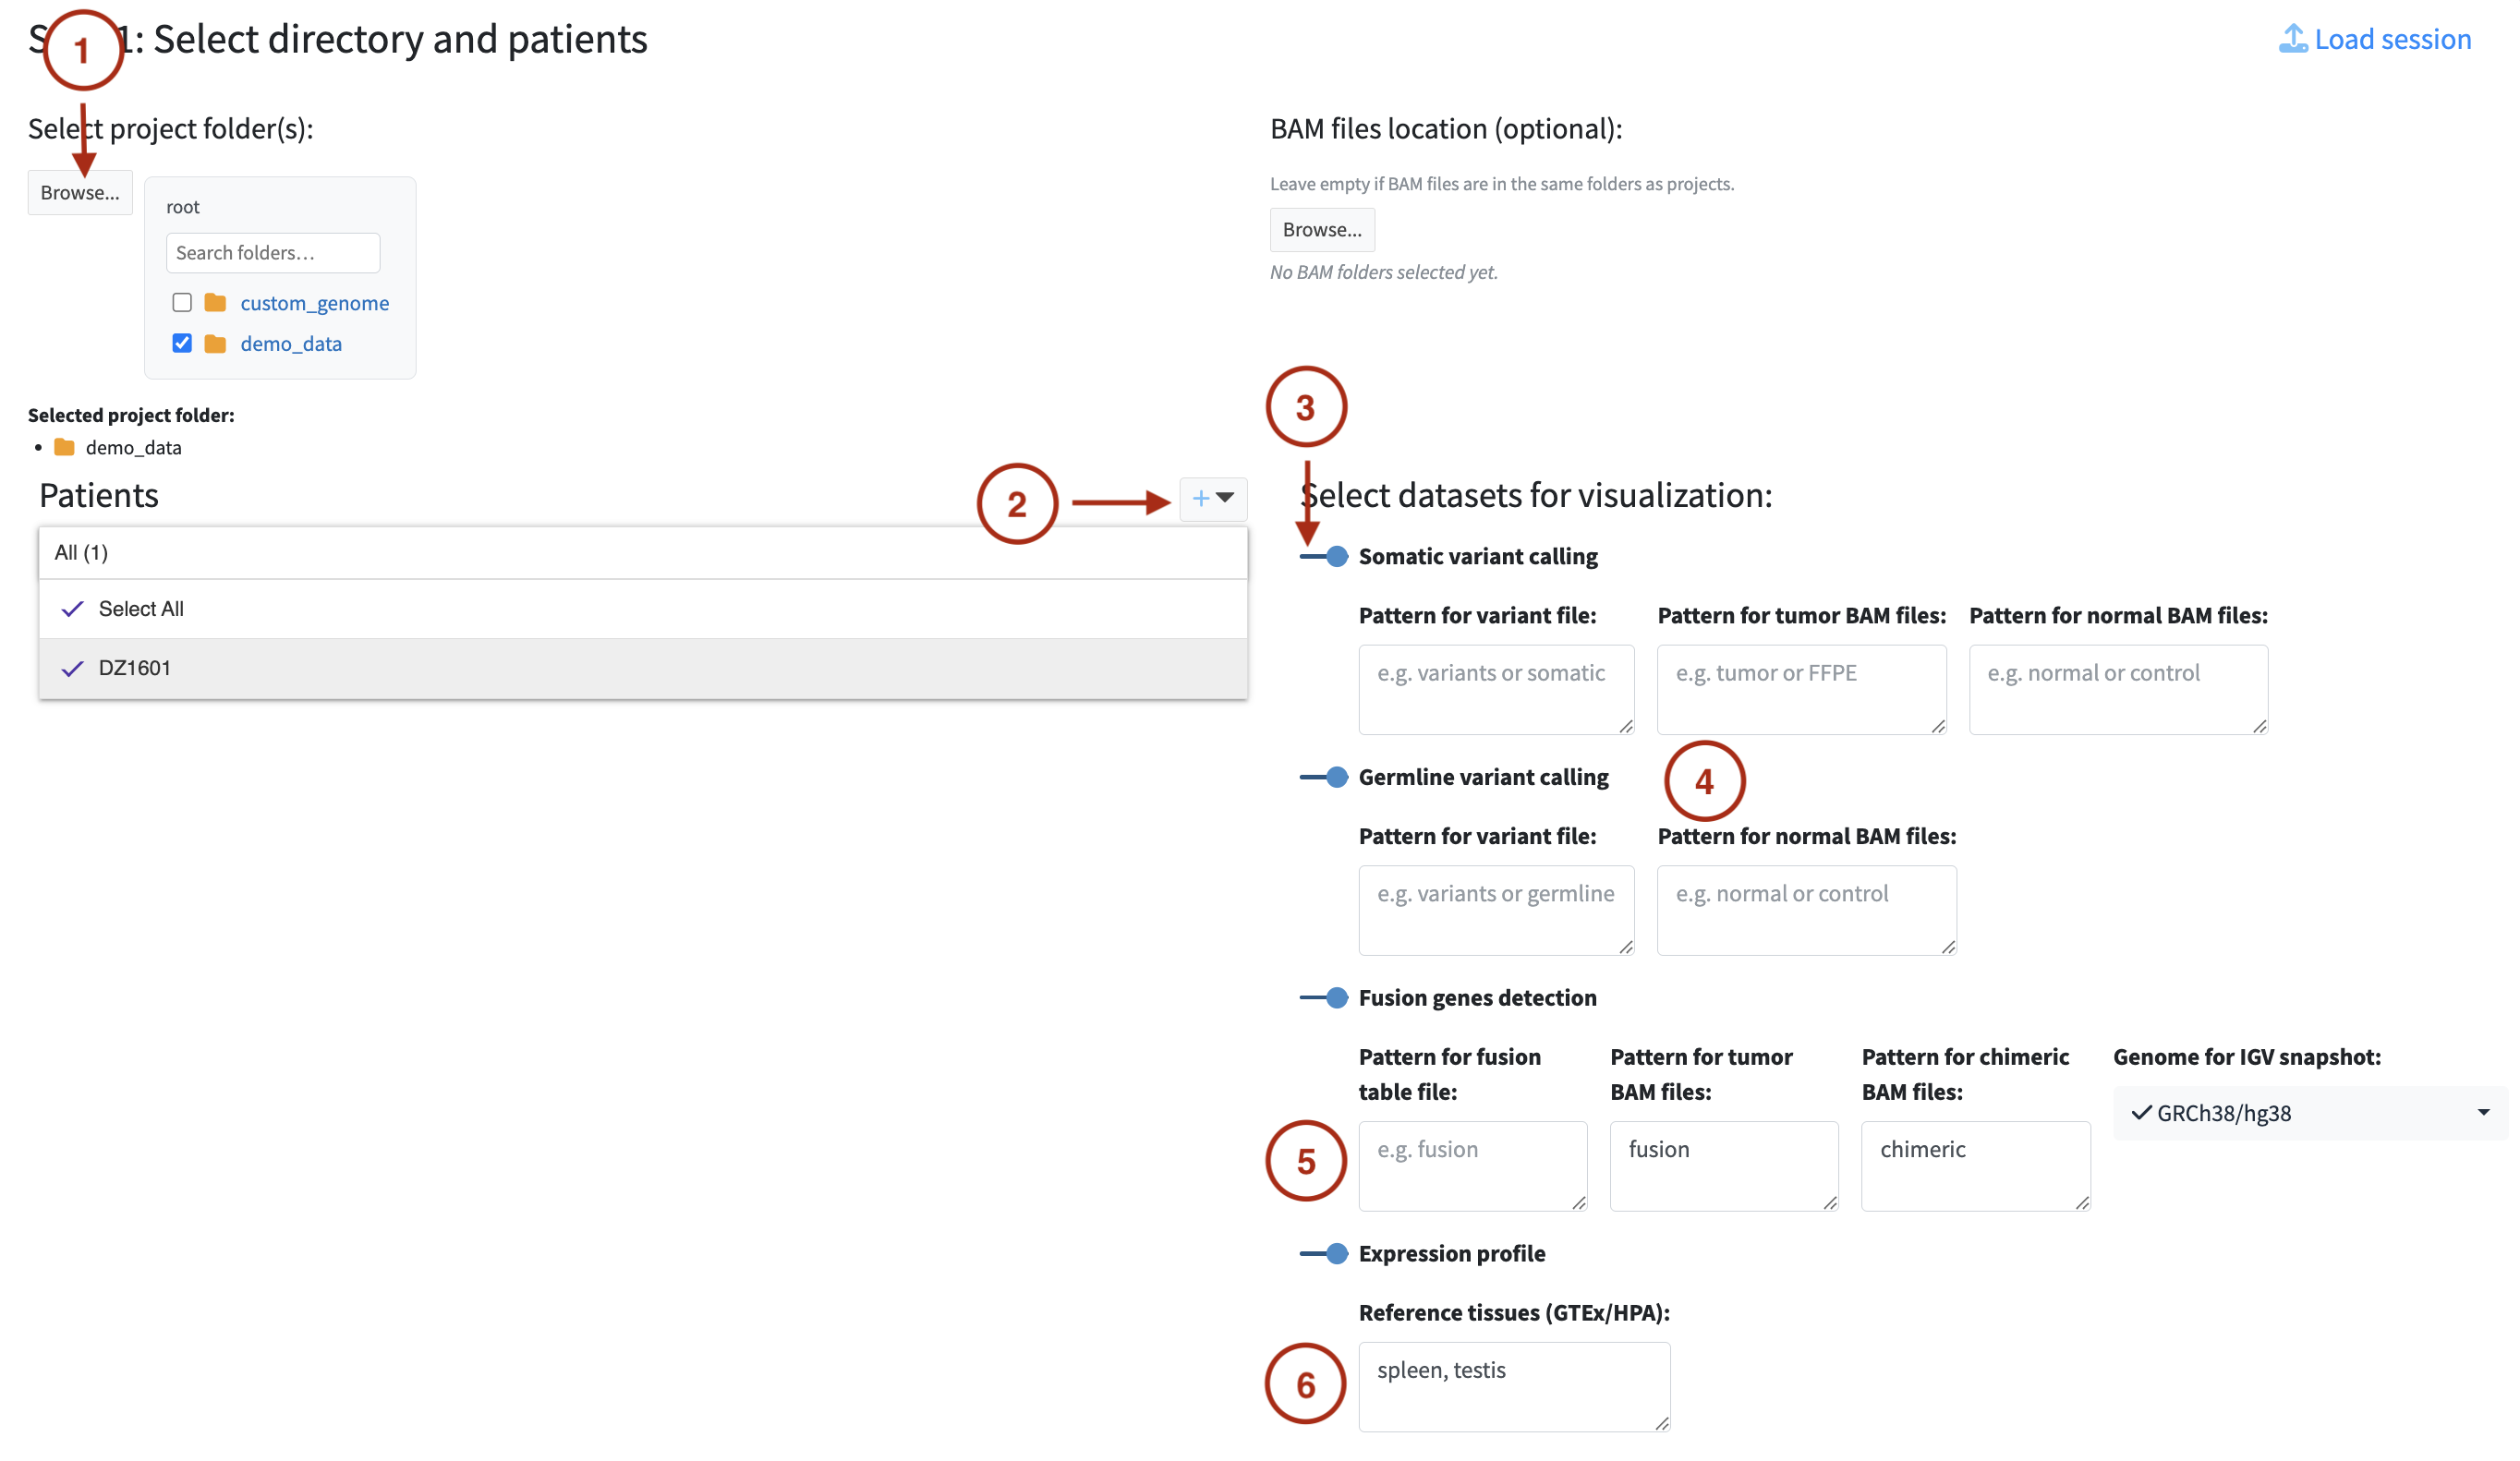
Select directory
Click Browse to select the root directory containing your patient data. The file browser
opens at /input_files by default — this is the directory mounted into the application
when running via Docker. If you are running the application locally without Docker, it opens
at the working directory.
Choose the most specific directory that still contains all patient folders. Selecting a too-broad directory (e.g. your home folder) may cause the file scanner to pick up unrelated files. See Data Requirements — Directory Layouts for guidance.
Use the optional BAM files location field only when your alignment files are in a separate directory from your analysis results, as in Option B of the directory layouts. Leave it empty when BAM files are in the same patient folders as the rest of the data. When set, this directory becomes the source for BAM files and any BAM files inside the project folders are ignored. Patient IDs and BAM patterns still apply.
Add patients
Enter one or more patient IDs using the + button next to the Patients panel. You can type multiple IDs at once, separated by commas or new lines. Patient IDs must match the identifiers used in your file paths — the scanner uses them to match files to the correct patient.
Select datasets
Toggle on the datasets you want to analyse. For each selected dataset, additional options appear:
Somatic variant calling
-
Pattern for variant file — an optional string that appears in the variant filename, used to
distinguish the annotated variant file from other
.tsvfiles in the same directory (e.g. if your pipeline produces bothDZ1601.variants.tsvandDZ1601.final.variants.tsv, you can use a pattern to select only the correct one). Leave empty if there is no ambiguity. -
Pattern for tumor BAM files — a string that appears in the tumor BAM filename (e.g.
tumor,FFPE). Leave empty if you do not want to use BAM files for this dataset. Enternoneif BAM files are available but have no prefix beyond the patient ID (e.g.DZ1601.baminstead ofDZ1601_tumor.bam). - Pattern for normal BAM files — same logic as above for normal DNA BAM files.
Germline variant calling
- Pattern for variant file — same as for somatic variants.
- Pattern for normal BAM files — for normal DNA BAM files.
Fusion gene detection
- Pattern for tumor BAM files — for tumor RNA BAM files.
-
Pattern for chimeric BAM files — for chimeric BAM files (e.g.
chimeric). -
Genome for IGV snapshot — select the reference genome to use when generating IGV snapshots
of fusion breakpoints. Available options:
GRCh38/hg38,hg38 1kg/GATK,GRCh37/hg19,T2T CHM13-v2.0/hs1,Custom(configured viareference_paths.json), or Don’t create IGV snapshots if you want to skip IGV snapshot generation.
Expression profile
-
Reference tissues — enter tissue names matching the tissue identifiers in your expression
filenames (e.g.
blood,liver,blood_vessel). If your data contains a single expression file per patient with no tissue suffix, leave this field empty. Different patients can have different tissue sets — tissues that cannot be matched to a file for a given patient are simply treated as unavailable for that patient.
BAM pattern matching: Patterns are matched against the filename. A pattern of tumor will
match patient_001_tumor.bam but not patient_001_normal.bam. Multiple patterns can be
entered separated by commas (e.g. tumor, FFPE). Leave the field empty to skip BAM files
entirely. Enter none if your BAM files have no pattern beyond the patient ID.
Tissue names: Spaces are not supported — use underscores, dots, or hyphens as separators
(e.g. blood_vessel, blood.vessel, or blood-vessel). The tissue name must appear somewhere
in the expression filename — see
Data Requirements — Expression Files with Multiple Tissues.
Click Next to proceed to validation.
Step 2: Validation
After clicking Next, the application scans your selected directory and attempts to match files to each patient and dataset. The results are displayed in a validation table.
Each file type is shown with a status icon:
- 🟢 Green — required file found, everything is in order
- 🟠 Orange — optional files are missing (e.g. BAM files for IGV). The analysis can proceed, but some features will be unavailable
- 🔴 Red — a required file is missing or multiple conflicting files were found. This must be resolved before you can continue
Review the table carefully, especially the tissue-to-file pairing for expression data if you specified multiple tissues. Once you are satisfied, click Confirm to load the data and proceed to the analysis modules.
Made a mistake in Step 1? Use the Back to Selection button to return and adjust your configuration without losing your patient list or dataset selections.
Files added or renamed after scanning? Use the Refresh button to re-scan the directory without going back to Step 1. This is useful if you noticed a missing file and added it to the directory while the validation table was open.
Common errors and solutions
Required file missing
The expected variant, fusion, or expression file was not found for a patient. Check that:
- The file exists in the patient directory
- The patient ID appears somewhere in the file path
- The dataset type keyword appears somewhere in the file path (see Data Requirements — Dataset Type Keywords)
- The file has the correct extension (
.tsvfor variants,.tsvor.xlsxfor fusion and expression)
Multiple files found
More than one file of the same type was found for a patient. Check that:
- There are no duplicate files in the directory
- BAM file patterns are specific enough to select only one file per type
Missing BAM or BAI
A BAM file was found but its index file is missing. Generate the index with:
The index must be named file.bam.bai or file.bai and placed in the same directory as the BAM.
Missing Arriba PDF or TSV
Only one of the two Arriba output files was found. Both the .pdf and the .tsv must be present
with matching base names and both must contain arriba in their path.
Tissue matching error
The number of expression files found does not match the number of tissues specified, or the tissue names cannot be matched to file names. Check that:
- Each tissue has exactly one corresponding expression file
- Tissue names in the form match the tissue identifiers in the filenames
- Underscores are used instead of spaces in multi-word tissue names
Fusion Pre-processing
When fusion gene data is confirmed and BAM files are available, the application automatically starts a background pre-processing step before the Fusion Genes module becomes available. This step generates IGV snapshots of each fusion breakpoint and extracts Arriba report images. Tasks that can take several minutes depending on the number of fusions and the size of BAM files.
Crucially, this runs in the background — you do not need to wait for it to finish. You can immediately start exploring somatic variants, germline variants, and expression data in the other modules while snapshot generation is in progress. The Fusion Genes module will progressively update as snapshots become available.
If the application detects that snapshots from a previous session already exist for the same dataset, a dialog will ask whether you want to Resume (reuse existing snapshots and only generate the missing ones) or Clean Start (delete existing outputs and start fresh). This is useful if a previous session was interrupted partway through.
If you selected Don’t create IGV snapshots in Step 1, the IGV snapshot generation is skipped but Arriba report images are still extracted if Arriba files are available. The expanded row preview in the Fusion Genes module will contain Arriba visualisations but no IGV images.
Session Management
SeqUIaSCOPE supports saving and loading analysis sessions so that diagnostic work can be interrupted and resumed at any point without repeating the upload and validation steps.
Saving a session — click the icon in the top navigation bar at any point during your
analysis. The session file captures your current configuration, selected patients and datasets,
all flagged variants, fusions, and genes, any notes you have added, and the completion
state of each dataset. The file is saved to the output_files/ directory.
Loading a session — click the Load session button in the top right corner of Step 1. Select the previously saved session file. The application will restore your configuration and all selections, skipping the directory selection and validation steps.
Accidental navigation: If you try to close or refresh the browser tab after data has been loaded, the application will show a warning asking you to confirm. This is to prevent accidental loss of unsaved work.